

Saturday, November 29, 2014
Friday, November 28, 2014

Wednesday, November 26, 2014

Tuesday, November 25, 2014

Monday, November 24, 2014

How to Keep Fit Over the Holidays:
Keeping fit over the holidays may seem an impossible task. All of the delicious foods that go hand-in-hand with the holidays are hard to resist. You may have neither time nor inclination for your regular exercise during the busy season. Holiday shopping, party planning, getting ready for company and other errands combine to weaken resolve and send willpower the way of the North Pole. But a few strategies can help you navigate holiday fitness obstacles with no regrets on the other end.
Step 1
Set the achievable goal of simply maintaining your current weight, and consider yourself a success if you make it to January without any extra pounds. Losing weight is notoriously hard during the holiday season. Holiday weight gain, while averaging only 1 pound overall, is as much as 5 pounds for those already overweight or obese, according to a 2000 study published in “Nutrition Reviews.” But don’t think you’re off the hook if you only gain a pound. The study also found that the extra pound usually does not go away, and may account for more than half of that creeping annual adult weight gain.
Set the achievable goal of simply maintaining your current weight, and consider yourself a success if you make it to January without any extra pounds. Losing weight is notoriously hard during the holiday season. Holiday weight gain, while averaging only 1 pound overall, is as much as 5 pounds for those already overweight or obese, according to a 2000 study published in “Nutrition Reviews.” But don’t think you’re off the hook if you only gain a pound. The study also found that the extra pound usually does not go away, and may account for more than half of that creeping annual adult weight gain.
Step 2
Navigate holiday meals wisely. Have a high-protein snack ahead of time; for example, beef jerky has surprisingly few calories, but packs in the protein, which will help you feel full. Or, choose cottage cheese and fruit; either way, you will eat less at the dinner or buffet table.
Navigate holiday meals wisely. Have a high-protein snack ahead of time; for example, beef jerky has surprisingly few calories, but packs in the protein, which will help you feel full. Or, choose cottage cheese and fruit; either way, you will eat less at the dinner or buffet table.
Step 3
Save the best for last. Keeping fit doesn’t mean you have to deprive yourself of holiday goodies; rather, save them for last. Eat the salads, fruits and vegetables first, with low-fat dressings and dips; you will be less likely to binge later on the sweet and fattening fare that usually accompanies holiday meals.
Step 4
Cut back on what you eat at the holiday meal itself to save calories. If you’re going to have pumpkin pie after dinner, skip the mashed potatoes and gravy instead of the lunchtime sandwich. The holiday season is full of potlucks and parties, and skipping meals to save room for them may backfire on your fitness goals, according to Federal Occupational Health. You’ll likely end up so hungry by the time the potluck rolls around, you will overeat, and any perceived benefit will disappear.
Step 5
Reward yourself for exercise. Stay motivated to exercise by giving yourself incentive. The little things you do for yourself are often the first to go to accommodate the holiday rush. So, when you succeed in fitting your workout into your over-scheduled day, pamper yourself as congratulations. Take an extra-long shower. Watch your favorite show on the DVR or curl up in bed with a good book. In all of the holiday commotion, remember to take care of yourself, too.
Step 6
Stay active. Some days, you just won’t be able to fit exercise into your holiday schedule. Take the stairs instead of the elevator. Don’t drive if you can walk. Step up the pace while you’re shopping for gifts, and stroll around the block after dinner, or even before. Every little bit adds up to keep fit and keep the holiday pounds off.
TipsExercise early in the day, when you are more likely to be motivated. If you’ve already burned some calories, you will feel less guilty when you plop down on the couch with a sugar cookie after a long day of holiday hustle and bustle.
Saturday, November 22, 2014

There seems to be a time around 3 p.m. most weekdays when the energy tank falls dangerously close to empty, and the only feasible options are downing a carafe of coffee or face-planting on the keyboard. There’s a third option, though—and it’s quite tasty: Nosh on some strategic snacks to bring back that alert, energized state of mind.
“Any time you go longer than four to five hours without eating, the body’s energy levels can crash significantly,” says Lisa Moskovitz, R.D. “Having a nutrient-rich snack that’s low in sugar and saturated fat will ensure your body has the fuel to keep going so you can easily complete all of your daily tasks.”
And that fuel isn’t going to come from the candy bowl. Eating carbs (read: sugar) alone is a ticket to the rollercoaster spike of pep followed by the crash that feels worse than if you had face-planted. But since fat and protein slow the rate at which carbs are absorbed by the body, adding them to the mix will lead to a steadier lift in blood sugar levels, says Bonnie Taub-Dix, R.D., author of Read It Before You Eat It. Translation: a smoother, crash-free lift in energy.
This list of snacks is perfect for both bringing to work and running errands, and each has a trifecta of nutrients to keep you going harder, better, faster, stronger—even when the toughest slump hits.
1. Trail Mix
When you toss mixed nuts together with dried fruit (and even bits of dark chocolate), you’ve got an easy-to-tote snack—and one of Taub-Dix’s top recommendations. Experiment with these trail mix recipes and see which one provides the tastiest, longest-lasting boost.

2. Quinoa
With 8 grams of protein per cup (including all nine essential amino acids) and a healthy dose of iron,quinoa is a solid snack choice when you’re running low on fuel. How do you make a grain portable, though? Whip up Cheese and Vegetable Quinoa Bites, Quinoa Egg Muffins, or, for a sweet treat, Cranberry Quinoa Muffins.
3. Apple or Banana with Peanut Butter
The world became a better place when companies started selling nut butters in single-serving, squeeze pouches. (OK, slight exaggeration.) Take an equally easy grab-and-go fruit like an apple or banana along for the ride, and when an energy emergency strikes, rip open the PB, smear it on, and all will be okay. And delicious.
4. Popcorn
Get poppin’ to put some pep back in your step. Air-pop some kernels and use a light hand with the toppings to keep the calorie count low—Moskovitz suggests using just a little olive oil (one teaspoon for two cups). We also love using coconut oil.
5. Cheese Kebabs
While most cheese has 6 to 7 grams of protein per ounce, gruyère outshines the bunch with 8.5 grams. There’s the protein and fat, now add tomatoes or grapes for carbs. Make it fun to eat by spearing cubes of cheese and cherry tomatoes or grapes on toothpicks and storing them in a plastic container. Proof, once again, that you can never go wrong with cheese.

6. Ants on a Log
This snack may be a favorite among the playground crowd, but there’s no reason adults can’t enjoy it too. To jog your memory: It’s peanut butter inside of a celery stick with a few raisins on top. Easy, cute, and #TBT-worthy. For more mature taste buds, try almond butter with dried cranberries or cashew butter with dried cherries.
7. Sweet Potato Smoothie
When you think of energizing sips, you probably think of coffee, soda, and energy drinks. But whipping up a smoothie is a quick and easy way to give yourself a jolt without hitting the caffeine. One of Taub-Dix’s favorites is a sweet potato smoothie: Combine 1/2 medium baked potato, 1/2 cup plain Greek yogurt, 1/2 banana (or 1/2 cup berries), 2 teaspoons cocoa powder, and 3 ice cubes in a blender and mix until smooth. Or follow Moskovitz’s easy-peasy recipe: Blend 6 ounces Greek yogurt with 1 cup fresh fruit and 1 tablespoon peanut butter. Pour into a mason jar for effortless portability.
8. Veggies and Hummus
Thanks to individual-serving cups, hummus can be an anywhere, anytime snack. Dunk veggies like carrot sticks and sliced bell pepper and jicama for a nutritious kick that’ll keep you going all the way to dinnertime.
9. Chicken, Hummus, and Veggie Lettuce Wrap
Hummus isn’t just for dipping! Spread some on a large lettuce leaf and top with 2 slices of deli turkey, 1/4 cup chopped cooked chicken breast (from dinner last night or canned), shredded carrots, and thin cucumber slices, then roll it up. Add some avocado slices for extra flavor and those all-important healthy fats.

10. Spicy Roasted Chickpeas
Spice up your life (and your day) with this ridiculously easy recipe. Simply season rinsed and drained chickpeas with olive oil, salt, and cayenne pepper, and throw them in a 450-degree oven for about 15 minutes.
11. Hard-Boiled Egg
Talk about an egg-cellent snack! Eggs pack plenty of protein as well as the vitamins needed for the body to produce energy such as thiamin, riboflavin, folate, B12, and B6 —plus the hard-boiled version is easy to make in advance, store, and reach for as needed.
12. Almonds
We named ‘em a Greatist Superfood for a reason: Almonds are good-for-you bites that’ll help replenish energy stores thanks to their protein and fiber content. They also provide magnesium, a mineral that helps produce energy—research suggests that the bodies of people with deficiencies need to work harder, which means you wear out faster .
13. Pinwheels
The fun-sized version of a wrap, pinwheels are easy, little snacks that can also help boost your energy. Try layering two slices of deli turkey and two slices of cheese in a whole-wheat tortilla, roll it up, then slice as thinly as you desire. Add any veggies you like since it never hurts to get more in.
14. Dry-Roasted Edamame
If the only time you nosh on these green-colored beans is when you hit up your favorite sushi spot, you’re missing out on some energy-boosting benefits that can be used on the reg thanks to dry-roasted varieties. Just pop for a pick-me-up from the protein, magnesium, and iron, which helps transport oxygen to cells, where it’s used to release energy.

15. No-Bake Energy Bites
Take your pick from nostalgic peanut butter and jelly, gourmet cranberry pistachio, and treat-yo’self sugar cookie (for real!). In any flavor, these balls filled with goodness will snap you out of the worst slow-mo moment.
16. KIND Bars
Though they’re hands-down one of the most convenient snacks, bars get a bad rap—in part because they can have crazy-high sugar contents and chem lab ingredients. But KIND keeps it real—er, natural—and comes in low-sugar, high-fiber, and high-protein options. Plus with flavors like Cashew & Ginger Spice, Maple Glazed Pecan & Sea Salt, and Thai Sweet Chili, you’ll look forward to snack time.
17. Pepitas
These green pumpkin seed kernels are small, mighty—more protein per ounce than almonds plus more iron and magnesium than most nuts—and totally delicious.
18. Cheese and Whole-Grain Crackers
For an easy, portion-controlled snack, slice up a mini Babybel cheese round and serve the wedges on top of whole-grain crackers, suggests Taub-Dix.
19. Whole-Grain Cereal
Most of us have had cereal for dinner, so why not snack on it as well? (Though we recommend not doing both in the same day.) Bag up a serving of a high-fiber brand such as Fiber One or Total, and it’ll keep that blood sugar—and energy—strong and steady.

Friday, November 21, 2014

Thursday, November 20, 2014
.jpg)
Wednesday, November 19, 2014

How to make a Strength Training Plan
greatist.com
Venturing into the weight room can be overwhelming at times. People grunting in the corner while heaving heavy dumbbells, weights clanking together on a barbell; and to top it all off, there’s a sea of machines with multiple moving parts and levers. Toss in choosing the right exercises and number of sets and reps, and strength training can seem overly complex (calculator anyone?).
But there is a method to the madness. When done effectively, lifting weights offers amazing benefits, not only for building bigger muscles and achieving that desired physique, but also boosting your resting metabolism (translation: burn more calories outside the gym!) . Regular strength training can even improve mood and confidence levels .
Ready to find that perfect training plan? To get us started (and keep us motivated along the way), we enlisted the help of Greatist Experts Dan Trink, Director of Personal Training Operations at Peak Performance, and Kelvin Gary, personal trainer and owner of Body Space Fitness. Check out their helpful tips, plus sample programs to hit the ground (err…gym floor) running!
Pump Some Iron—Getting Started
Starting a strength training program is a little more complicated than just grabbing some dumbbells and your favorite gym tee and hoisting away—it requires a set program. Before hitting the weights, check out these tips to get started on the right foot:
- Set goals! Goals should be the driving force of any strength training program. Follow the SMARTacronym (Specific, Measurable, Attainable, Relevant, and Time bound) and make sure to set both short and long-term targets.
- Start small. Three days a week (on non-consecutive days) for 45-minute sessions should be enough for most individuals to see big gains starting out, says Trink. Any longer and the chance of injury skyrockets.
- Focus on compound lifts. Gary advocates multi-joint exercises (think squats and deadlifts) as the backbone of any strength training program. By using big moves, lifters can get more done in less time. Plus, it always pays to focus on (and master!) the basics before moving on.
- Prioritize Lifts. Put the most important exercises first. That way, fatigue won’t compromise form on the biggest lifts . In general, compound lifts should go first with more isolated exercises (finally, a spot for curls) towards the end of the workout.
- Watch the clock. Limit rest periods between sets to maximize efficiency in the gym. Trink uses the following guidelines:
- 6 reps or less = rest 2-3 minutes
- Above 6 reps = rest 75 seconds or less
- Combine cardio and strength. Gary recommends performing exercises back-to-back (referred to as supersets in the fitness realm) to get the benefits of strength and cardio. By supersetting compound lifts, you’ll get your heart rate up and get a great cardio workout on the weight room floor.
- Log all workouts. Keeping track of sets, reps, and exercises is crucial for noting progress and identifying when it’s time to up the intensity. Write down sets, reps, and weights used for all workouts. Keeping a log also acts as a motivator!
- Vary the program. Avoid sticking to the same routine for more than six weeks, Trink advises. Lifters should switch up their program to avoid getting bored and plateauing (going a few weeks without seeing any results).
- Don’t skip the extras. Make time for foam rolling and stretching to help prevent muscles from tightening up and to stay injury-free!
3, 2, 1… Lift Off!—Your Action Plan
Ready to get started? Whether you’ve got three, four, or five days to devote to training, these programs will help you make the most out of hitting the gym.
I Have… 3 Days a Week
Your plan: Total Body Routine
Why it works: This program hits all major muscle groups during each workout, yielding maximum gains in minimum time.
What to do: Complete 2-3 sets of 10-12 reps of the following exercises. Note: Perform A and B exercises back-to-back as supersets. Rest 60 seconds between each exercise.
Monday (Day One)
1A) Barbell Deadlift
1B) Dumbbell Bench Press
1B) Dumbbell Bench Press
2A) Lunge (bodyweight or using dumbbells)
2B) Single-Arm Dumbbell Shoulder Press
2B) Single-Arm Dumbbell Shoulder Press
3A) Leg Press
3B) Plank (Hold for 30-45 seconds)
3B) Plank (Hold for 30-45 seconds)
Wednesday (Day Two)
1A) Barbell Back Squat
1B) Chin-up (bodyweight or assisted)
1B) Chin-up (bodyweight or assisted)
2A) Single-Arm Dumbbell Row
2B) Singe-Leg Stability Ball Hamstring Curl
2B) Singe-Leg Stability Ball Hamstring Curl
3A) Side Lunges (bodyweight or using dumbbells)
3B) Reverse Crunch
3B) Reverse Crunch
Friday (Day Three)
1A) Barbell Front Squat
1B) Inverted Row
1B) Inverted Row
2A) Single-Leg Dumbbell Deadlift
2B) Incline Dumbbell Bench Press
2B) Incline Dumbbell Bench Press
3A) Reverse Lunge (bodyweight or using dumbbells)
3B) Side Plank (Hold for 30-45 seconds)
3B) Side Plank (Hold for 30-45 seconds)
I Have… 4 Days a Week
Your plan: Upper/Lower Body Split
Why it works: Dedicating focused time to upper and lower body workouts means more specificity and detail for each workout leading to fast progress and big gains.
What to do: Complete 2-3 sets of 10-12 reps of the following exercises. Note: Perform A and B (or A, B, and C) exercises back-to-back as supersets. Rest 60 seconds between exercises.
Monday (Day 1 – Lower Body)
1) Barbell Back Squat
2A) Walking Lunge (bodyweight or use dumbbells)
2B) Lying Hamstring Curl
2B) Lying Hamstring Curl
3A) Leg Press
3B) Calf Raise
3C) Plank (Hold for 30-45 seconds)
3B) Calf Raise
3C) Plank (Hold for 30-45 seconds)
Tuesday (Day 2 – Upper Body)
1) Chin-up (bodyweight or assisted)
2A) Single-Arm Dumbbell Row
2B) Incline Dumbbell Bench Press
2B) Incline Dumbbell Bench Press
3A) Cable Chest Fly 3B) Barbell Bicep Curl
3C) Reverse Crunch
3C) Reverse Crunch
Take Wednesday off, then on repeat the same Upper/Lower Split on Thursday and Friday.
I Have… 5 Days a Week
Your Plan: Body Part Split
Why it works: Devoting specific days to each body part allows for a targeted approach to building muscle and seeing results.
What to do: Complete 2-3 sets of 10-12 reps of the following exercises. Note: Perform A and B (or A, B, and C) exercises back-to-back as supersets. Rest 60 seconds between exercises.
Monday (Day 1 – Chest/Triceps)
1) Dumbbell Bench Press
2A) Incline Dumbbell Press
2B) Dips
2B) Dips
3A) Cable Chest Fly
3B) Tricep Pushdown
3C) Plank
3B) Tricep Pushdown
3C) Plank
Tuesday (Day 2 – Lower Body)
1) Barbell Squats
2A) Single-Leg Deadlift
2B) Lunges
2B) Lunges
3A) Leg Press
3B) Glute Hamstring Raise
3C) Calf Raise
3B) Glute Hamstring Raise
3C) Calf Raise
Wednesday (Day 3 – Back/Biceps)
1) Pull-Up
2A) Single-Arm Dumbbell Row
2B) Dumbbell Reverse Fly
2B) Dumbbell Reverse Fly
Friday (Day 4 – Lower Body)
1) Barbell Deadlift
2A) Single-Leg Squat
2B) Lunges
2B) Lunges
3A) Leg Press
3B) Calf Raise
3C) Plank
3B) Calf Raise
3C) Plank
Saturday (Day 5 – Shoulders/Abs)
2A) Seated Dumbbell Shoulder Press
2B) Dumbbell Lateral Raise
2B) Dumbbell Lateral Raise
Remember, exercise is just part of the fitness equation. Getting quality sleep and proper nutrition can maximize all of the sweat sessions (especially post-workout). Vary the reps/sets every few weeks to prevent boredom and keep the body guessing. Keep progressing workouts to avoid hitting the wall and transform into a lean strength training machine!
Tuesday, November 18, 2014

Monday, November 17, 2014

Saturday, November 15, 2014

Friday, November 14, 2014

Thursday, November 13, 2014

Wednesday, November 12, 2014

Plus, they’re super old school. Hippocrates used sand-filled animal skin pouches to help patients recover from injuries almost 2,000 years ago (clearly he was on to something). When choosing a weight, pick a ball that’s heavy enough to slow the motion (slower than if you weren’t using any weight at all), but not so heavy that control, accuracy, or range of motion take a hit (or the poor guy next to you).
Reps and sets will depend on intensity and fitness levels, so for most of these moves, we recommend aiming for three sets of 10-20 reps with good form. For those more focused on power and speed performance, switch it up with 3-5 sets of 3-5 reps (applying max force and max speed into every repetition ). Of utmost importance: Be aware of your surroundings. These balls can be a weapon of sorts, so pay close attention to the people (and pricey equipment) around you. Alright then, let’s go balls to the wall.
Full Body

1. Rock and Roll Up: This one is a toughie at first to coordinate, but hits all the major muscle groups in one powerful move (byahh!). Lie down, back to the mat, with knees bent. Hold a medicine ball on the ground with arms fully extended overhead. Pull the knees into the chest, preparing to use the weight of the ball (and the strength of your core!) to help catapult you to a controlled squat position, then standing. Next, slowly lower back into a squat, and ease back to the floor, butt first before lying back down. Don’t get too comfy though: The goal is to rock and roll for 10-12 reps.
2. Lunge With Twist: Come on baby, let’s do the twist! Engage that core, standing hip width apart with shoulders relaxed. Holding a medicine ball a few inches in front of the chest, step forward into a lunge with the right leg. (Safety first! Keep the knee from sliding forward past the toes.) Get deep into that lunge, making sure the front thigh is parallel with the floor, then with extended arms, reach the medicine ball to the right, rotating the torso at the same time. Maintain the lunge and return to center. Come to standing, then lunge with the other leg (and rotate to the left this time). These can be done in place, or moving forward as walking lunges. Do the twist for 10-12 reps per side.
3. Lunge With Overhead Press: Stand with the feet together, holding a lightweight medicine ball in front of the chest in both hands. Lift the right foot off the floor, bending the knee, and hold this position for one count before stepping forward into a lunge. With the bodyweight shifting to the right leg, reach the medicine ball straight overhead (try to avoid pulling a matrix move). While still in the lunge, pull the ball back to the chest, and bring the front leg back to the starting position. Lunge for 10 reps per leg.
4. Squat Press and Throw: Heels grounded, come to a squat position (as if sitting in an invisible chair). Drive through the heels to jump, and throw the ball straight up as high as possible — then get the hell out of the way! (a quick step back should do the trick). Let the ball drop to the ground. Press it out for 10-15 reps.
5. Reverse Swing: This move could be as disastrous as throwing a bowling ball the wrong way, so read carefully. Stand with the feet hip-width apart. Hold a medicine ball directly in front of the chest, with the elbows pointing down toward the floor. Lower into a squat, keeping the back flat, and head facing forward. Reach the medicine ball back between the legs. Ready for the fun part? Explosively swing the ball up overhead to the point that it reaches behind the head and neck (just don’t throw it backward!). Keep the abs contracted as the ankles, knees, and hips extend. Bonus: Throw the ball to the ground (andwatch out for your face!). Ball so hard for 10-12 reps.
Legs & Glutes

6. Reaching Romanian Deadlift: This one takes balance, and a little breathing room to fully extend. Stand on the right leg, with a medicine ball in both hands. Bend the right knee slightly, and hinge forward at the hips, extending the left leg straight back (and for an extra challenge, extending the arms overhead). Feel like a ninja? Check! The body should now form a straight line that’s perpendicular with the standing leg. Return the extended leg to the floor, and repeat for 10-12 reps, then switch legs.
7. Step Jump: Hold a medicine ball to the heart, and never let go (Jack), while straddling the middle of a low bench or step (make sure it’s sturdy!). Drop into a squat until the tush makes contact with the bench. Stand about six inches from a low bench or platform, and jump up onto it so the feet land in a natural, wide stance.. Carefully jump back down to the start position. Jump up for 10-12 reps.
8. Circle Squat: Stand holding a medicine ball at the right hip. Circle the ball overhead toward the left, while stepping out the left leg to into a squat (just like a sumo wrestler). Circle the ball all the way to the right side of the body, while still in the squat, then step the feet back together, and circle the ball back to the right. Repeat 8-10 times through, then switch directions.
9. Single-Leg Squat: Stand with feet hip-width apart, knees slightly bent. Lift the right foot off the ground and extend it forward. Hold a medicine ball in front of the bellybutton. Lower the body into a squat position, sitting back into an imaginary chair with the knees safely positioned over the feet. Return to start position, and switch legs. That’s one rep. Get your squat on for 10-12 more.
10. Single-Leg Butt Lift: We’re warning you, this one really puts on a show. Lie on your back and place the sole of the right foot onto the medicine ball. Thrust the hips to the sky (very Jane Fonda-esque) with the left leg straight in the air, with all your weight supported by the right foot and the shoulders. Hold for one count, then slowly return to the start position with the butt on the matt, and repeat for 10-12 reps on each side.
Chest and Back

11. Medicine Ball Push-Up: Drop down and get ballsy. Starting in a traditional push-up position, toes tucked under, place your palms on the medicine ball, and shift your bodyweight forward until in plank position. Keeping the core tight, and the head aligned with the spine, slowly lower the chest toward the ball (woof!) until it nearly touches, keeping the elbows pinned tightly at your sides. Finish the move by pressing upward through the arms until they’re fully extended. Need an adjustment? Pop the knees on the mat and push it real good for 10-12 reps.
12. Weighted Superman: Lie face down on the mat with arms stretched out in front, holding onto a lightweight medicine ball (try starting with 4-6 lbs). Slowly raise the arms and legs up as high as possible, engaging the back muscles. Hold the position at the top for a few counts, all the while pretending you have a cape around your neck. Lower the body back down to the mat and repeat for 12-15 reps.
13. Lying Chest Toss: Since two balls are better than one, this move enlists a pair. Lie face up on a stability ball with the head and shoulder blades resting on the ball’s center, and knees bent at a 90-degree angle (the torso should be parallel to the floor). Keeping the neck in a neutral position (not straining forward or hanging back), hold a medicine ball with both hands just above the chest, with the elbows bent and pointed out to the sides. Push the ball out, in line with the chest, (like a classic chest pass) and toss it straight up toward the ceiling. Be extra careful not to toss the ball too hard. (Just remember: What goes up must come down.) Repeat for 12-15 reps.
14. Rolling Push-Up: If 9th Grade phys ed is in the past, then you know what push-ups are all about. Adding in a medicine ball quickly morphs the upper body-blaster into an even more challenging move. Get into high-plank with a medicine ball under one hand, and lower the chest toward the floor to perform a push-up. Return to high-plank and roll the ball to the other hand. Roll out 8-10 reps, or as many as possible maintaining good form.
15. Wall Pass: Find the nearest med ball-safe wall (when in doubt, always ask the gym’s staff which areas are fair game). Stand about 3-4 feet in front of it, holding a lightweight medicine ball with both hands. Get into an athletic stance, with a slight bend in the knees, and the core engaged. Bring the ball to the chest, and firmly throw it at the wall (get that aggression out!), and catch the ball on its return. Your mission: Balls to the wall for 12-15 reps — without taking off another gym goer’s head.
Shoulders and Arms

Tuesday, November 11, 2014

Monday, November 10, 2014

Saturday, November 8, 2014

Kettlebells are all bells, no whistles. Resembling a mini bowling ball with a handle, kettlebells are greatfor cardio, strength, and flexibility training . Start by picking up the weight of your choice—women usually grab between eight and 16 kg weights, while men go for 16 to 32 kg, though these weights vary depending on the exercises of choice. (No harm in starting low and working your way up!) Reps and sets will depend on intensity and fitness levels, for most of these moves, we recommend aiming for 3-5 sets of 10-30 reps with good form. (We suggest starting with a trainer or kettlebell aficionado to make sure everything’s kosher). Ready to rock? Let’s give these kettlebells a swing, snatch, or clean!
1. Russian Kettlebell Swing
Targets: Shoulders, back, hips, glutes, legs
Level: Beginner
How to: To do the perfect kettlebell swing, stand up straight, with feet a bit wider than hip-distance apart. Grab the handle with both hands, keeping the palms face down and arms in front of the body. Maintain a slight bend to the knee and drive the hips back, lowering the body—but not too low (this isn't a squat!). Then, in a fluid motion, explosively drive the hips forward while swinging the kettlebell, keeping the glutes and core engaged. Remember: The motion should come from the hips, not the arms, as the body returns to standing. Lower the weight back down between the legs and keep this swinging motion going for 12 to 15 reps.

2. Single-Arm Kettlebell Swing
Targets: Shoulders, back, hips, glutes, legs
Level: Beginner-Intermediate
How to: This movement is just like the two-handed swing, but uses one hand at a time. Swing the kettlebell up with one arm, but still swing the other arm to help drive momentum. Alternate hands when the kettlebell is behind the legs; aim for 10 to 12 reps with each arm.
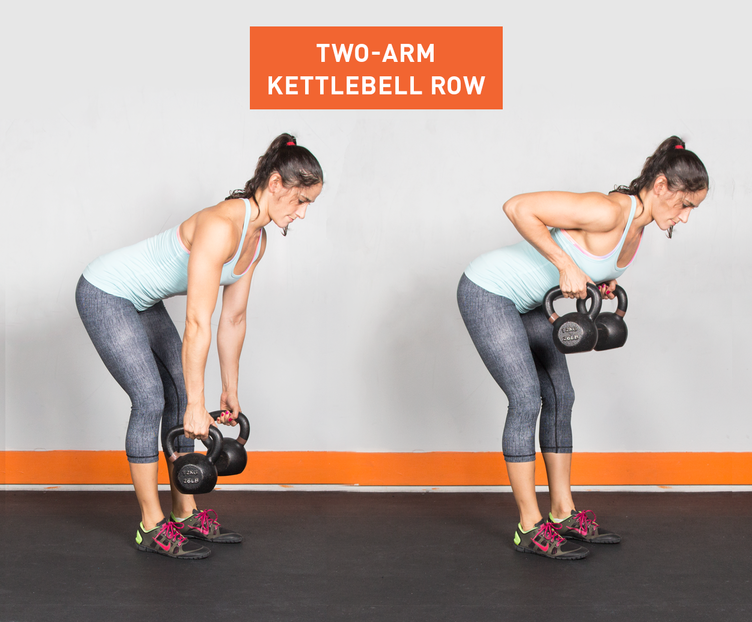
3. Two-Arm Kettlebell Row
Targets: Back, arms, shoulders
Level: Beginner-Intermediate
How to: Grab two kettlebells for this one. (Double the pleasure, double the fun, right?) Place them in front of the feet and bend the knees slightly. Next, bend over to grab both kettlebells and pull them towards the stomach, keeping the elbows close to the body and the back straight. Lower the weights, repeat for 12 to 15 reps max, feel like a champ.
4. Kettlebell Figure-8
Targets: Arms, back, abs
Level: Intermediate
How to: Looking to impress a certain someone at the gym? Then try this: Start with legs a bit wider than hip-width distance apart, and lower yourself into a quarter-squat position. (Keep that back straight and chest up!) Grab the kettlebell with the left hand and swing it around the outside of the left leg and then back between the legs. Next, pass the kettlebell to the right hand and swing it around the outside of the right leg. Keep this motion going, similar to the classic basketball drill! Can you do a minute straight? (Be sure to switch directions half-way through!)
5. Kettlebell Goblet Squat
Targets: Legs, glutes, back
Level: Intermediate
How to: What’s a squat without a kettlebell in hand? Stand up straight, holding the kettlebell in front of the chest with both hands, keeping the elbows close to the body. Start squatting by driving the heels into the ground and pushing the hips back until the thighs are parallel to the ground or just below. Return to standing, and repeat for 15-20 reps (or more!) Just remember: quality over quantity!

6. Kettlebell High Pull
Targets: Shoulders, arms, glutes, legs
Level: Intermediate
How to: Turn those toes out 45 degrees with feet a bit wider than shoulder-width apart. Place the kettlebell on the ground between both legs and begin to squat while keeping the core engaged, and grip the kettlebell handle with one hand. Then, using force from the hips, push through the heels to rise to standing, pulling the kettlebell upwards while the elbow drives up. Lower back down and switch arms. Shoot for 10 to 12 for each arm.
7. Kettlebell Lunge Press
Targets: Shoulders, back, arms, abs, glutes, legs
Level: Intermediate
How to: Here’s a new way to spice up those lunges. Stand up straight while holding the kettlebell in front of the chest with two hands, arms bent and palms facing each other. Lunge forward with one leg while raising the kettlebell overhead (raise the roof!). Return to standing while returning the kettlebell to the chest. Try for 10-15 reps on each leg.

8. Kettlebell Sumo High-Pull
Targets: Back, legs, shoulders, arms
Level: Intermediate
How to: We promise no wrestling is involved. Start with the kettlebell between the feet, set a bit wider than hip-distance apart. Grab onto the handle with both hands with the knees bent and hips back. Then,pull the kettlebell to the shoulders while the knees straighten and elbows rise. Remember: The force is coming mostly from the hips, the arms pulling at the very end. Keeping the core engaged the whole time, move the weight back down by the ground and repeat for 12-15 reps.
9. Kettlebell Russian Twist
Targets: Abs, obliques
Level: Intermediate
How to: Forget crunches. Sit with the legs bent and feet flat on the floor, about hip-distance apart. Hold the kettlebell with both hands at the chest, and then lean back to a 45 degree angle. Here’s the fun part:Rotate the torso from left to right by twisting at the waist and swinging the kettlebell across the body. See how many you can do, with perfect form of course!

10. Kettlebell Windmill
Targets: Shoulders, back, abs, obliques, hips
Level: Advanced
How to: Hold the kettlebell in the right hand and angle the feet 45 degrees away from the right arm.Raise the kettlebell overhead, lock the arm, and keep your eyes on the weight (which will help keep the shoulders aligned!). Shift your weight onto the right leg and begin bending forward at the waist. Keep the right arm extended overhead as the body bends forward and the left arm is pointed toward the ground. (For all you yogis out there, this should feel similar to triangle pose.) Lift back up slowly, staying in control. Repeat for 6 to 8 reps on each side.
11. Single-Arm Kettlebell Floor Press
Targets: Chest, arms, core
Level: Intermediate
How to: Lie on the ground with your legs straight. (Nope, it’s not time for savasana!) Grab a kettlebell by your side and, with the palm facing in, press the weight straight up while rotating the wrist (so the palms face the feet). Bring the kettlebell back down to the starting position, and repeat for 6 to 8 reps.

12. Kettlebell Slingshot
Targets: Back, arms, abs, obliques
Level: Intermediate
How to: No rocks or rubber bands required for this move. Keep feet shoulder-width apart, and hold the kettlebell in front of the body, arms extended at chest level. Swing the kettlebell behind the back with one hand, then reach back with the opposite hand to grab it, swinging the kettlebell to the front of the body. Continue round 'n round for 8-12 reps, then switch directions!
13. Side Step Kettlebell Swing
Targets: Legs, glutes, back
Level: Intermediate-Advanced
How to: This move is like a traveling kettlebell swing—now we’re going places! Grab a kettlebell and start with the basic two-handed swing (see move No. 1). When the bell is down between the feet, step the right foot out to the right; then, when the bell is up, bring the left foot to meet the right (so the legs come together). Keep side-steppin' your way to the right (10 to 15 steps), then head on back the other way, leading with the left foot.
14. Kettlebell Deadlift
Targets: Legs, glutes, arms, back, abs
Level: Intermediate-Advanced
How to: Who says you need a barbell to deadlift? Stand with the kettlebell between the feet on the floor. Squat down and grab a hold of the handle with both hands while the back remains flat. Engage the core, tighten those glutes, and keep the arms extended as the body rises on up, kettlebell and all! Aim for 12 to 15 reps, maintaining proper form throughout.

15. Kettlebell Clean
Targets: Legs, butt, back
Level: Advanced
How to: Start with the kettlebell between the feet. Begin to swing upwards: Shrug the shoulders, pulling the body and 'bell up to the shoulder. The 'bell should end in the “rack” position: resting on the forearm, which is tucked close to the body, the fist at your chest. Bring the weight back down to the floor and repeat for 10 to 15 reps.
16. Two-Arm Kettlebell Military Press
Targets: Shoulders, arms, back
Level: Advanced
How to: Made it through move the kettlebell clean without breaking a sweat? Grab two kettlebells and clean them to the “rack” position. Then, press the kettlebells up while leaning forward at the waist so the weights are positioned behind the head. Bring them back down to the shoulders and continue pressing for 10 to 20 reps, depending on the weight you’re pushin’.

17. Single-Arm Kettlebell Split Jerk
Targets: Shoulders, chest, back, legs
Level: Advanced
How to: Start by cleaning the kettlebell to the shoulder, finishing with the palm facing front. Next, bend the knees and press the kettlebell overhead while jumping into a split jerk position. (Stay steady!) Return to standing while the kettlebell remains overhead, and then lower the weight. Aaand repeat! Shoot for 4 to 6 on each side for starters.
18. Single-Arm Kettlebell Snatch
Targets: Shoulders, chest, back
Level: Advanced
How to: Start with a kettlebell between the feet with the knees bent. Then, explode up onto your toes, pulling the kettlebell until it reaches the chest with the elbow tucked in. From there, bring the weight overhead (hold on tight!). Then bring it back down close to the ground—that’s one rep; try for 6 to 8!

19. Kettlebell Power Plank With Row
Targets: Abs, arms, back
Level: Intermediate/advanced
How to: Think of this move as the fancy plank. Start in a plank position, but with hands grasping two kettlebell handles. Then, lift one kettlebell up so it reaches the hip— remember to keep the elbow in! Lower back down and repeat with the opposite arm. Do 6 to 8 on each side, or until you feel the burn!
20. Kettlebell Half Get-Up
Targets: Abs, arms, back
Level: Intermediate-Advanced
How to: It’s time to get low. Lie down on your back with legs straight out. Extend the right arm straight up, kettlebell in hand. Next, bend the left knee and begin to rise, with the left arm keeping the body propped up. Feel the abs burn? You’re doing things right! Sit all the way up, then carefully return to starting position. Knock out 8 to 10 reps per side if you’re up for the challenge.
21. Kettlebell Push-Up
Targets: Chest, arms, back
Level: Intermediate/advanced
How to: This move is simply a push-up, but with kettlebells included! Grab hold of each handle in the usual start position, then lower the body before pushing back up. It’ll definitely feel challenging with those hands on handles rather than on the floor! Shoot for 10-15 reps.

22. Kettlebell Push-Up With Row
Targets: Chest, arms, back
Level: Advanced
How to: Let’s take this push-up up a notch! Begin in a push-up position with the right arm holding the kettlebell. Perform a push-up and, at the top, lift the right elbow by squeezing the shoulder blades together with the weight about six inches behind the body. Then return back to the starting push-up position, pushin’ for 5 to 8 reps with each arm. Kettlebells are a great way to spice up the usual lifting routine. As with traditional strength training, two days a week is a great place to start—but don’t hesitate to weave those kettlebells into the standard weightlifting routine (dumbbells, bodyweight exercises, and cardio included!). Just remember to give each muscle group a break (48 hours should usually do it), and don’t forget to try these out with a trainer before swingin’ solo. Using proper form is key for a workout that’s safe, effective, and fun!
Subscribe to:
Posts (Atom)